Project Shopping List
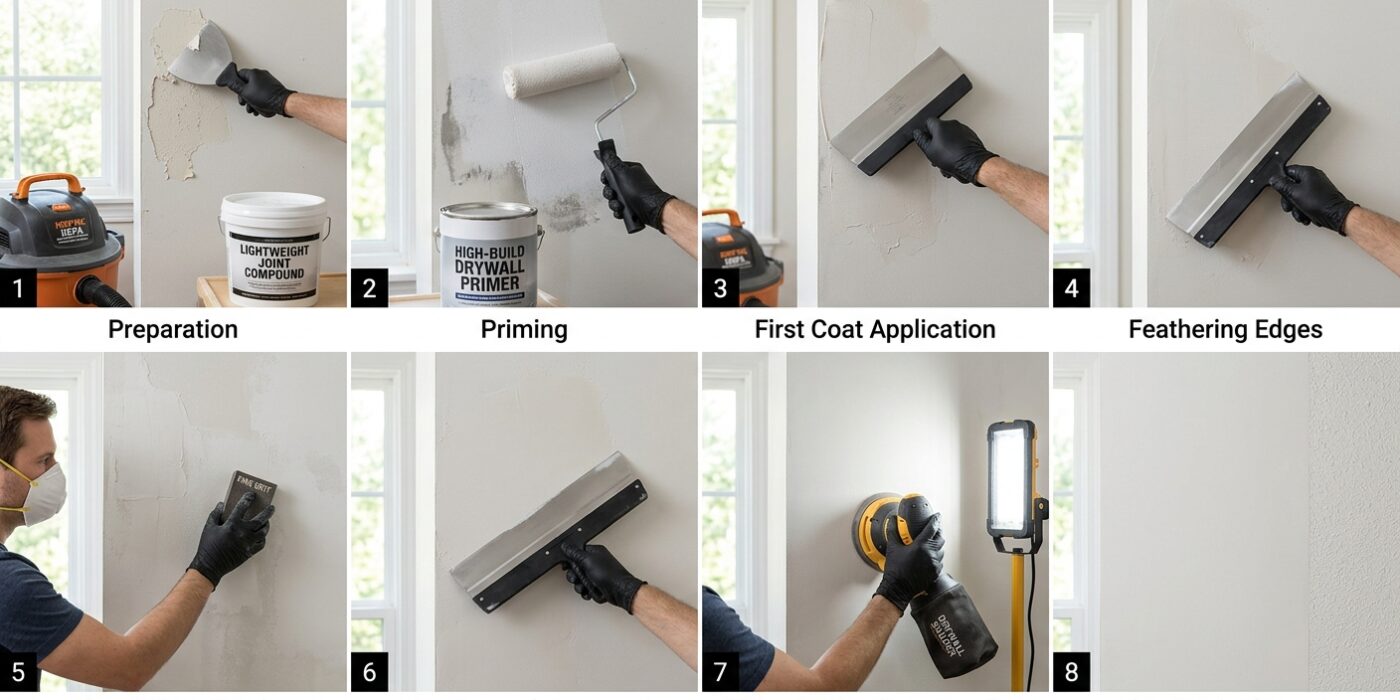
Skim coating is the process of applying a thin layer of joint compound over an entire wall or ceiling surface to achieve a smooth, uniform appearance. It is the technique used to cover textured walls, repair damaged drywall, and achieve Level 5 finish quality — the smoothest possible surface before painting. Skim coating takes practice but produces results that are impossible to achieve with sanding alone.
What You Need
- Lightweight joint compound (all-purpose thinned with water, or dedicated skim coat product)
- 12-inch or wider drywall knife
- Paint roller and tray (for applying compound to large areas)
- Pole sander with 120 and 220 grit
- Primer (high-build drywall primer)
- Strong lighting (side light reveals imperfections)
When to Skim Coat
Skim coating is the right solution for: covering existing wall texture (popcorn, orange peel, knockdown) without removing it; repairing a wall with many small repairs and dings that would look patchy if only spot-filled; achieving Level 5 finish in areas that will receive flat or eggshell paint where any surface imperfection will show; and skimming over fiberglass-faced drywall, which does not accept texture the same way as paper-faced drywall.
Step-by-Step Instructions
Step 1: Prepare the Surface
Prime the existing wall with a high-build drywall primer (PVA sealer for new drywall, bonding primer for existing painted surfaces). This step is essential — joint compound does not bond well to unprepared surfaces and will peel off existing paint or soak unevenly into raw drywall. Let primer dry completely before applying compound.
Step 2: Mix the Compound
Thin pre-mixed joint compound with water to a peanut butter or mayonnaise consistency — thin enough to spread smoothly with a knife but thick enough to hold a knife track without running. Lightweight compound skims more smoothly than all-purpose. Dedicated skim coat products (Sheetrock Tuff-Hide, etc.) require no mixing. Mix only enough for 30-60 minutes of work — compound in the tray sets faster than compound in a sealed bucket.
Step 3: Apply the First Skim Coat
Roll compound onto the wall with a paint roller (nap 3/8-inch or less) or apply with a wide knife directly from a hawk. Working in sections of 4-6 square feet, immediately pull the compound smooth with a 12-inch or wider knife held at a shallow angle. Apply enough compound to cover the surface uniformly, but keep it thin — a skim coat is 1/16 to 1/8 inch thick, not a thick bed coat. Work quickly before the compound begins to set up. Let dry completely (4-8 hours).
Step 4: Sand the First Coat
Sand the dried first coat with 120-grit on a pole sander to knock down any ridges, tool marks, or high spots. Do not sand through the compound into the surface below — you are just leveling the surface, not removing it. The first coat does not need to be perfect — subsequent coats fill remaining imperfections. Wipe dust with a damp sponge or tack cloth.
Step 5: Apply the Second Coat
Apply a second thin skim coat at 90 degrees to the direction of the first coat — this cross-hatching ensures complete coverage. The second coat fills any areas the first coat missed and provides the final surface. This coat should be even thinner than the first. Let dry completely.
Step 6: Final Sanding and Priming
Sand the second coat with 120 grit, then 220 grit for a final polish. Use strong side lighting to reveal any remaining imperfections — hold a work light at a very low angle and look for shadows. Apply a high-build primer after final sanding to seal the compound and provide a uniform base for paint. Paint absorbs into compound differently than into primer, causing flashing (dull spots) in the final painted surface without primer.
Pro Tips
- Keep your knife clean — dry compound on the blade leaves tracks in the fresh compound. Scrape the blade on the edge of the mud pan after every pass.
- Skim coating under poor lighting produces inconsistent results — set up a work light on a stand aimed at a low angle to the wall to reveal every imperfection as you work.
- The higher the gloss of the final paint, the more visible any imperfection will be — use flat or eggshell paint for skim-coated walls to minimize the appearance of any remaining texture.
Frequently Asked Questions
Can I skim coat over existing paint?
Yes, with bonding primer applied first. Without primer, joint compound will not bond to painted surfaces and will peel or delaminate when dry. Apply a coat of bonding primer, let it cure, then skim coat over the primer. This method works on latex-painted walls; oil-painted walls require light sanding before the bonding primer.
Is skim coating the same as plastering?
They are related but different. Traditional plaster uses lime or gypsum products applied over a metal or wood lath substrate. Skim coating uses joint compound (gypsum-based) applied over an existing drywall or painted surface. Modern “veneer plaster” is similar to skim coating — a thin gypsum layer over a blue board substrate. For most residential renovation, skim coating with joint compound achieves results equivalent to plaster at much lower cost.