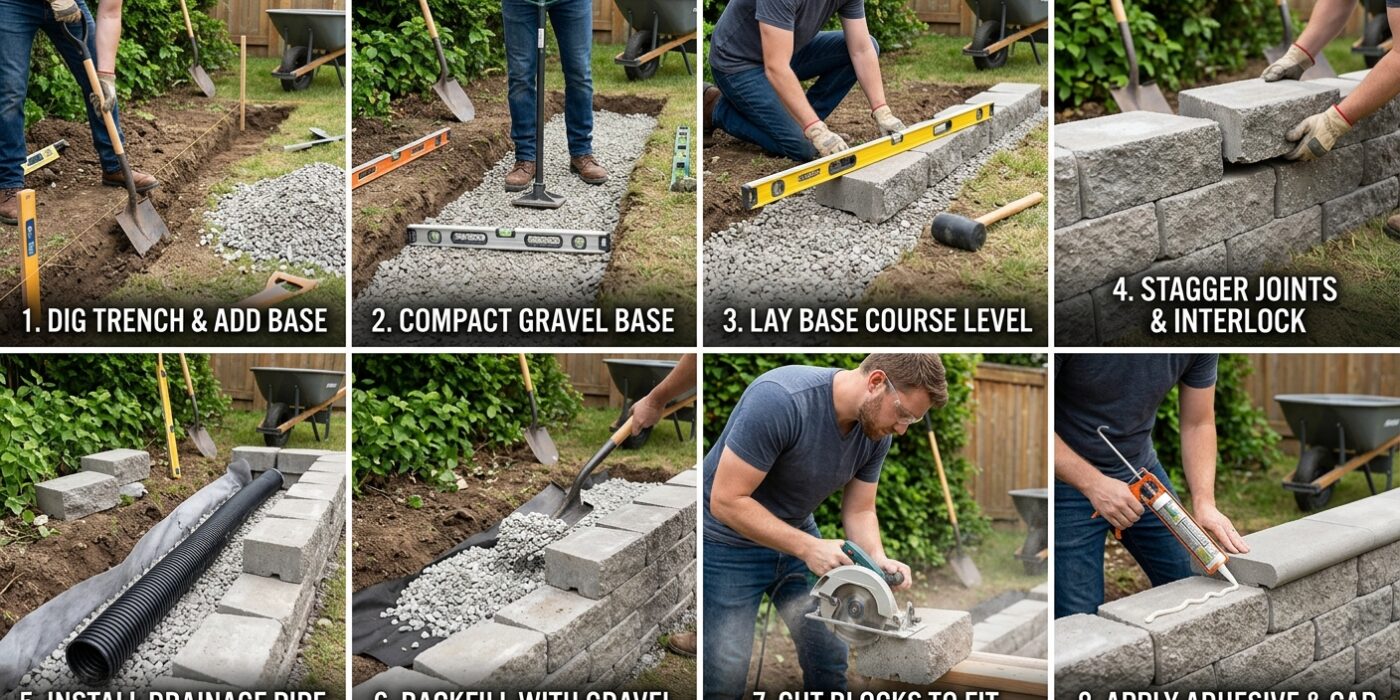
Project Shopping List
A concrete block retaining wall controls erosion, creates level terraces on sloped yards, and lasts decades with zero maintenance. The system is DIY-friendly: blocks are modular, no mortar is required for walls under 3 feet, and no special tools are needed beyond basic digging and leveling equipment.
This guide covers building a dry-stack wall up to 3 feet using standard retaining wall blocks. Walls over 3 feet typically require engineering and permits.
What You Need
- Retaining wall blocks (Allan Block, Versa-Lok, or equivalent)
- Cap blocks
- 3/4-inch crushed gravel for base and drainage backfill
- Landscape fabric
- Plate compactor (rent)
- Level, rubber mallet, string line
- Block adhesive for cap course
Step-by-Step Instructions
Step 1: Excavate the Base Trench
Dig a trench 6 inches deep and 24 inches wide along the wall line. The trench must be level from end to end — use a level or laser level to confirm. Any slope in the base gets amplified with every course added above it.
Step 2: Install Compacted Gravel Base
Fill the trench with 6 inches of crushed gravel in 2-inch lifts, compacting each lift with a plate compactor. The gravel base provides drainage under the wall (preventing frost heave) and distributes load over a wider area than a concrete footing would.
Step 3: Set the First Course
Set blocks along the trench, tapping each level front-to-back and side-to-side with a rubber mallet. Check level within each block, between adjacent blocks, and across the full run with a string line. Bury the first course one-quarter to one-third of its depth below finished grade for a natural look and toe protection.
Step 4: Backfill with Drainage Gravel
Before adding the second course, backfill the area behind the first course with clean crushed stone drainage gravel and compact it. This is not optional — drainage gravel prevents hydrostatic pressure from building behind the wall. Native soil alone behind a retaining wall always causes eventual failure.
Step 5: Set Subsequent Courses with Built-In Setback
Most retaining block systems have a built-in batter (backward lean) of about 1 inch per foot. Stack courses so the system’s setback engages naturally. Stagger vertical joints by half a block (running bond pattern). Check level and alignment after every course. Never stack blocks with continuous vertical joints — this dramatically reduces wall strength.
Step 6: Install Landscape Fabric
Before final backfilling with native soil, run landscape fabric from behind the drainage gravel zone up and over into the soil beyond. This separates gravel from soil and prevents the drainage layer from clogging with fine particles over time. Overlap fabric seams by at least 12 inches.
Step 7: Apply Cap Blocks
Apply block adhesive to the top course and press cap blocks firmly in place. Caps protect the wall top from water intrusion and give a finished appearance. Allow adhesive to cure 24 hours before backfilling behind the cap course.
Pro Tips
- Install a perforated drainpipe at the base of the drainage gravel zone, sloped 1/8 inch per foot to a daylight exit. This handles heavy rain drainage actively.
- Stepped footings handle sloped sites: the base trench steps down in increments equal to one block height rather than following the slope.
- Score and split blocks for corners using a cold chisel scored around all four faces, then a sharp hammer blow — most concrete blocks split cleanly this way.
Frequently Asked Questions
Do I need a permit for a retaining wall?
Most jurisdictions require permits for walls over 3-4 feet. Walls near property lines may require permits regardless of height. Walls over 4 feet typically need an engineered design with geogrid reinforcement — beyond typical DIY scope.
What causes retaining walls to fail?
Water pressure behind the wall is the leading cause. A wall without drainage gravel and a drainage outlet will eventually fail under the hydrostatic pressure of saturated soil. The second most common cause is inadequate base compaction, which allows the bottom course to shift and the wall to lean forward.